Urethrotome

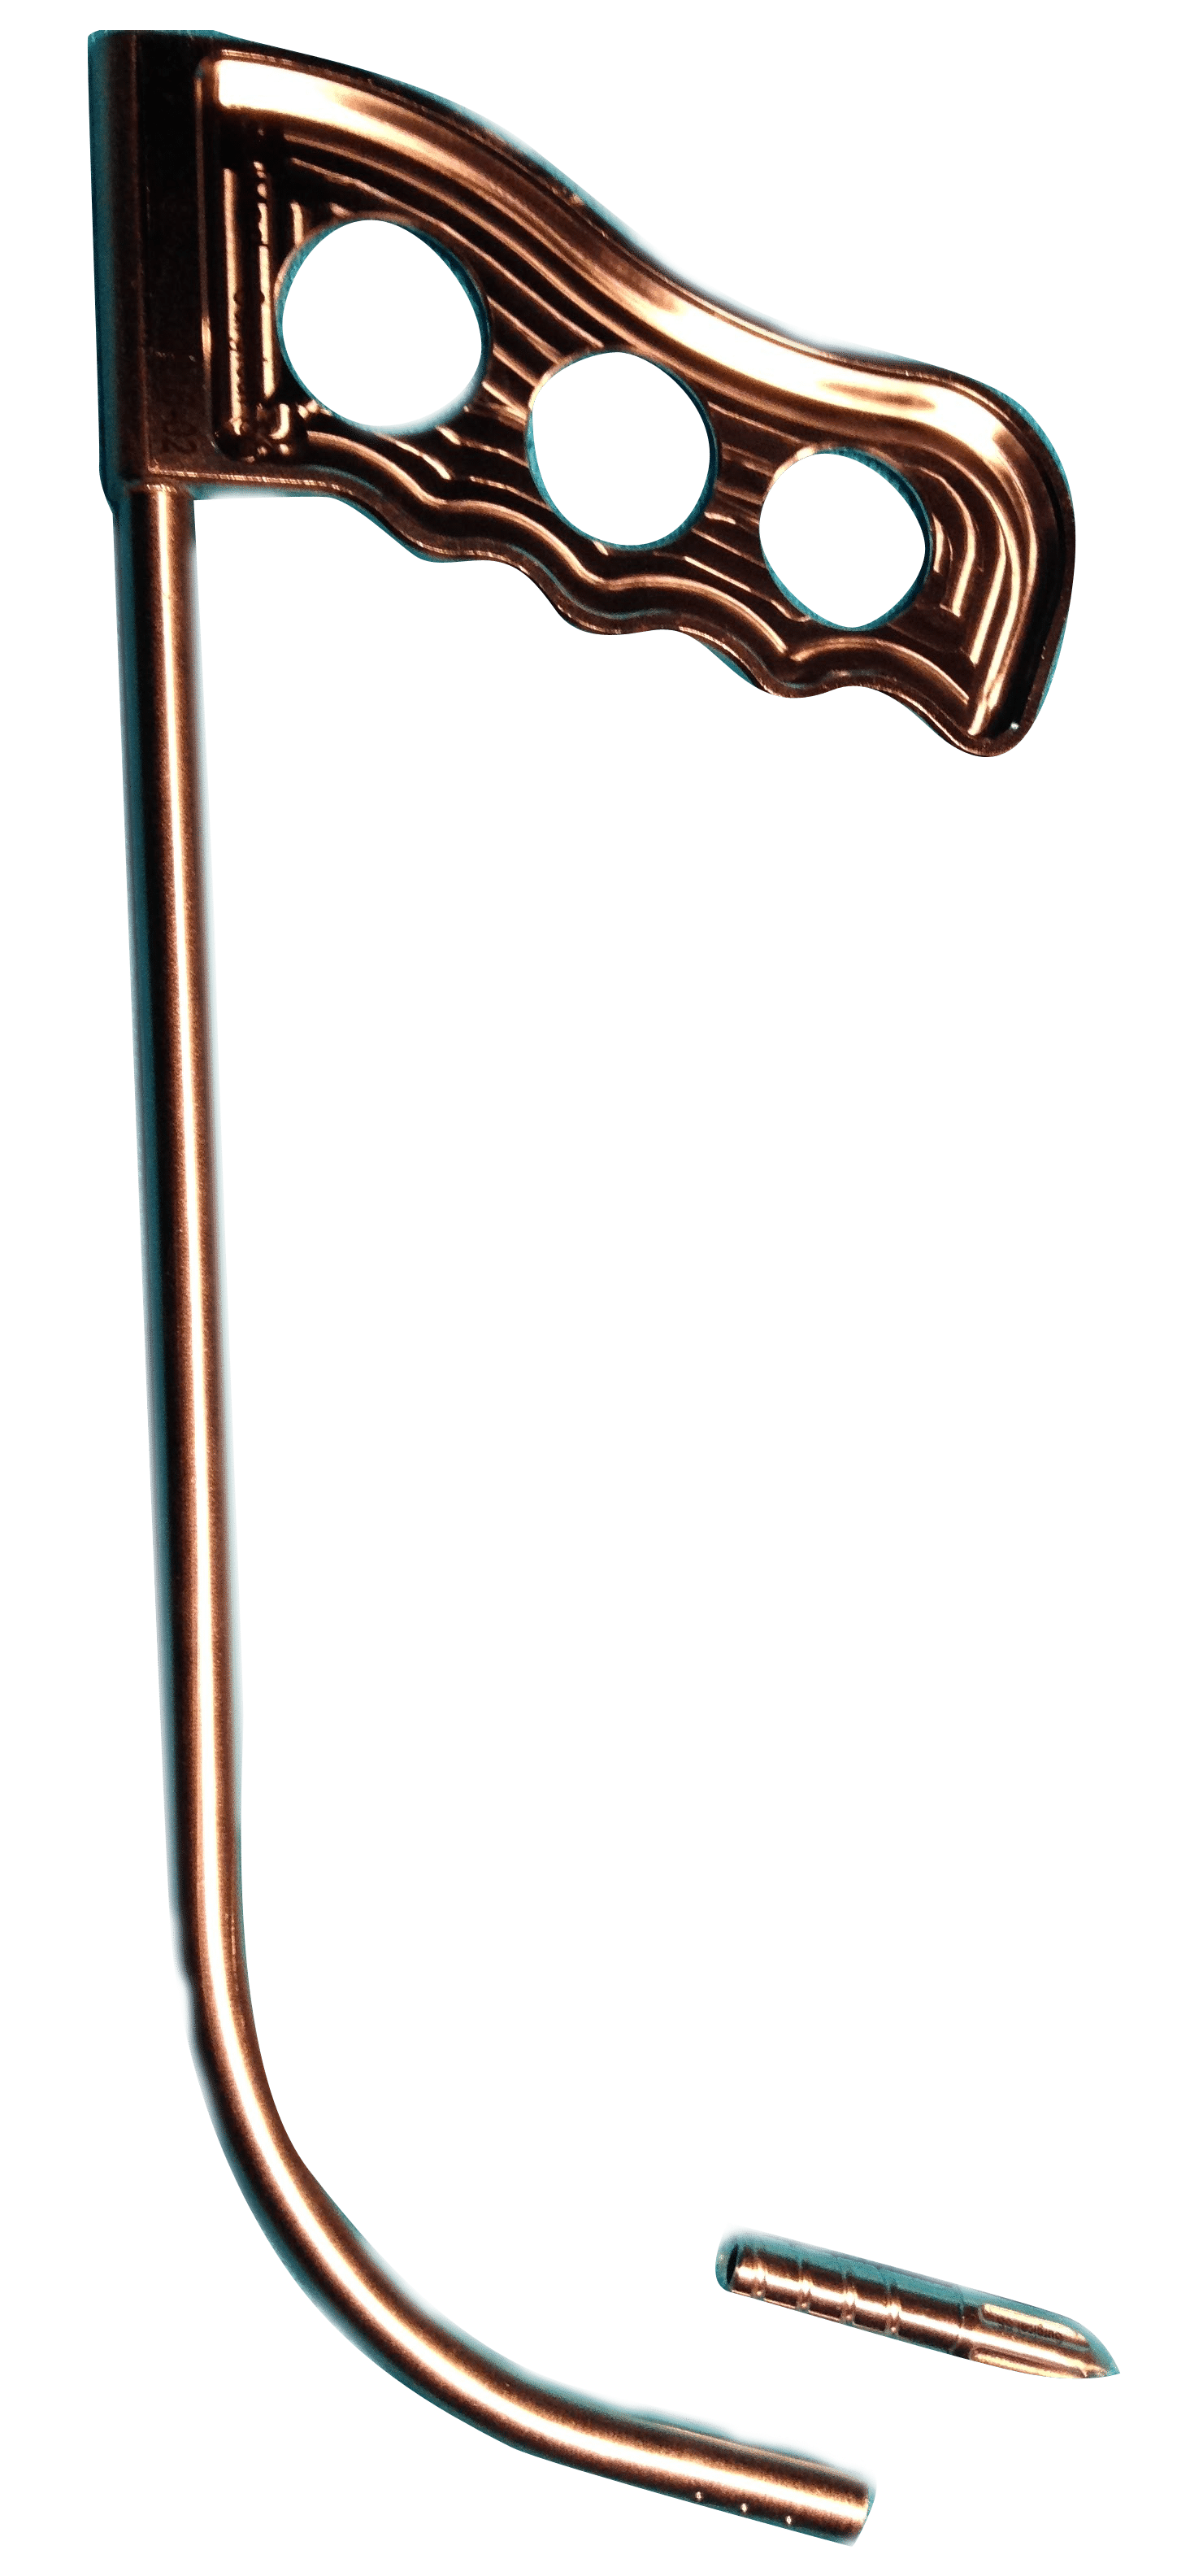
The Mooreville Urethrotome

The Otis Urethrotome simplified

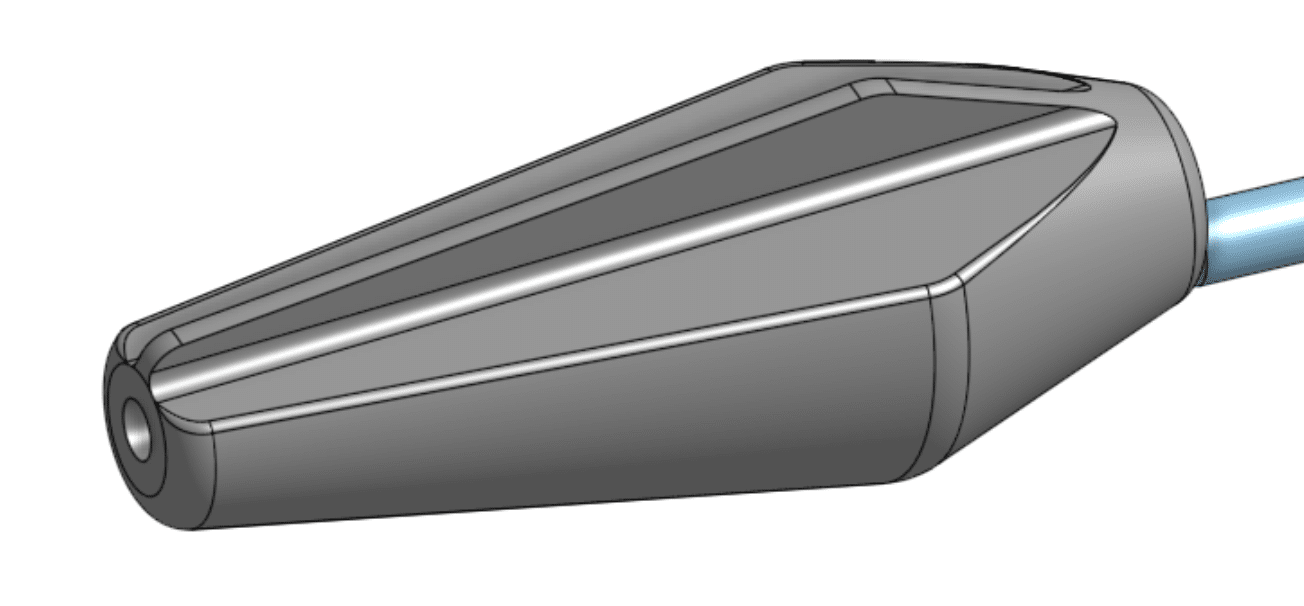
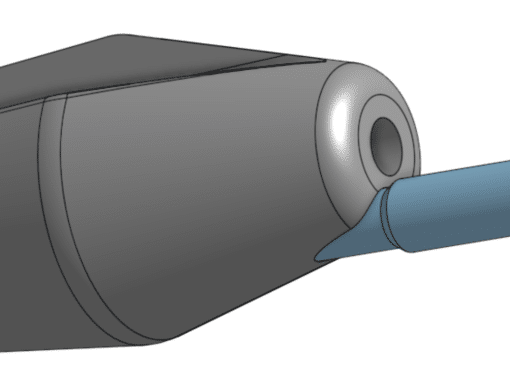
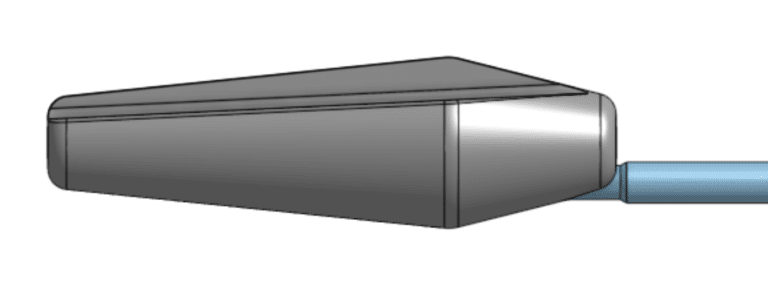
The new urethrotome allows for easy and safe non-visual internal urethrotomy by passage over a guidewire, no moving parts and cutting of only fibrous scar. The flat blade protects normal urethra, which is pushed gently away during passage.

HAVE QUESTIONS?

Dr. Mooreville is available to answer by email or a telephone conversation can be scheduled.

REACH OUT TODAY

sales@uramix.com
+1 610.394.9850

Key Benefits

Easy to use in multiple settings. Improved reimbursement.

Method of Use

Initially, after the instillation of an urethral anesthetic lubricant, a guide wire is passed into the urethra and through the stricture to the bladder. The urethrotome is loaded over the guidewire and slid gently to the stricture, which will be noted by increased resistance to the passage over the guide wire through the tactile feedback characteristic of the stem. Normal tissue is gently pushed out of the way. Markings on the stem will help localize the depth of the stricture from the meatus.

Advancing the urethrotome through the stricture will gently stretch fibrous bands, which will then be exposed to the sharp square edges of the urethrotome and divided as the urethrotome is advanced through the stricture. The 8-12 F and 10-20 F urethrotomes are enough for most strictures. They can also be used for bladder neck stenosis status post radical prostatectomy.
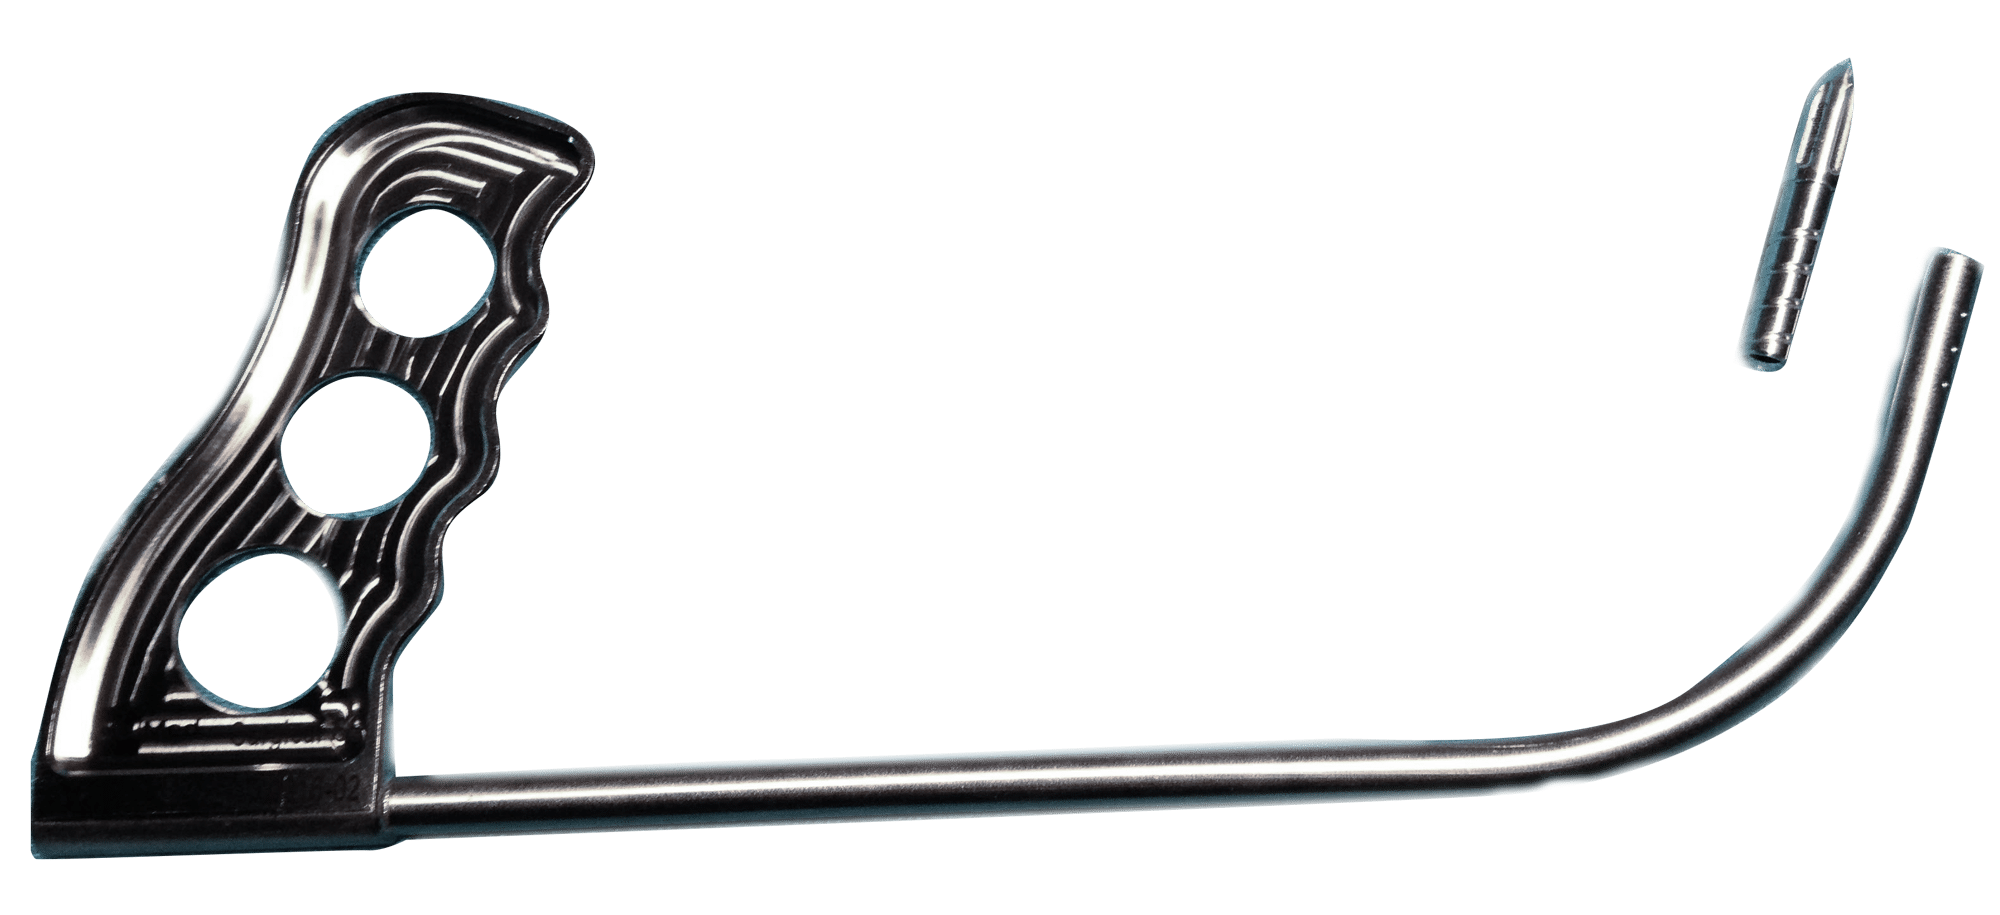
The urethrotome can also be used to enlarge a suprapubic tract over a guide wire as well as a nephrostomy tract. References below.

Features Overview

High Quality Material

Top grade surgical steel, does not need resharpening

Both the instrument and the handle are autoclavable

The main Set

2 different sizes, 8 – 14 F and 10 – 20 F. An extra large 12-26F urethrotome is available for meatotomies to allow a 26F resectoscope.

graded in centimeters

“CM” markings on the stem of the instrument to help assess the depth of the stricture. “Double” markings at 5, 10 and 15 cm

More Control

Flexible stem with tactile feedback characteristics.

Conical head

Central hole for passage over a guidewire

Blade Height

Height of blade does not exceed circumference of the cone

Pricing

$1,599 for full set (2) 8-14F and 10-20F

SKU #4401

Extra large (12-26F): $799

SKU # 4402

Shipping: $50

Patent # 10,500,379

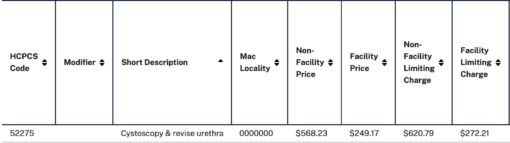
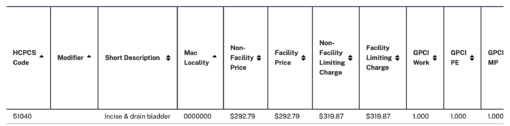
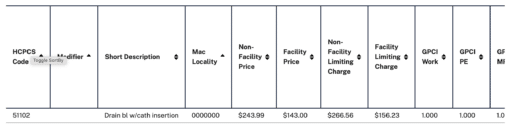
52275 – Internal Urethrotomy Code (2022)

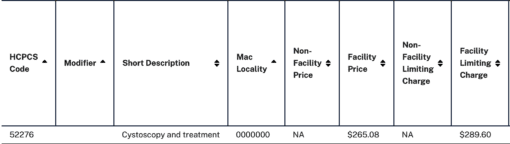
52276 – DVIU Code (2022)


Uramix does not endorse any particular code for billing purposes. These codes are only provided for information purposes.

1,2,3 cms.gov

references

Suprapubic tract dilation using the Otis urethrotome. Thrasher JB, Kreder KJ. Urology. 1993 Mar; 41(3):247-8.
https://www.ncbi.nlm.nih.gov/pubmed/8442308

Percutaneous nephrostomy tract incision using a modified Otis urethrotome. Ireton RC. Urology Clinics of North Am. 1990 Feb; 17(1):195-8
https://www.ncbi.nlm.nih.gov/pubmed/2305529

place an order

Fill out the information required and we will be in touch to continue the order process.

Trans-Urethral Supra-Pubic Tube Guide (TUSP)

Trans-Urethral Supra-Pubic Tube Guide (TUSP)

The TUSP was designed by Steven Ochs, a practicing urologist with Urology One in Canton, Ohio. 

Trans-Urethral Supra-Pubic Tube Guide – The TUSP is a reusable surgical tool designed to assist the urologist in placing suprapubic tubes using the retrograde technique. It addresses the shortcoming of the Lowsley retractor to provide a safer and more efficient placement of the suprapubic tube. The TUSP features a hollow shaft that will allow the passage of up to an 18F Foley following the removal of its cannulated end piece.

HAVE QUESTIONS?

Dr. Mooreville is available to answer by email or a telephone conversation can be scheduled.

REACH OUT TODAY

sales@uramix.com
+1 610.394.9850

Key Benefits

Easy to use, minimally invasive, retrograde approach when antegrade approach not feasible.

Surgical Technique for ColMed TUSPTM
Step One
Use an appropriate sterile catheter. Lubricate and confirm it fits within the TUSP cannula. Lubricate and screw the trocar tip into the distal end of the cannula until flush — it is secure with minimum finger tightening.
Step Two
Place the patient in lithotomy position and prep with appropriate sterilizing solution. Perform cystoscopy to survey the anatomy of the urethra and bladder. If there is risk of urethral trauma, consider pre-placement of a guide wire (<0.038 in). Determine the optimal location for the trocar to exit the abdominal wall, and mark.
Step Three
Place the TUSP retrograde through the urethra, into the bladder. For a male, place penis on stretch. While gently angulating the handle, palpate for the tip of the device near the exit mark.
Step Four
Make an incision in the skin approximate 1 cm above the tip. While maintaining deflection on the abdominal wall with the TUSP, dissect the intervening tissue with electro-cautery until trocar emerges from the incision. Continue to push the trocar through incision about 5 cm. Remove the trocar tip and leave the cannula above the incision a few cm.
Step Five
Guide the lubricated catheter into the cannula about 25 cm (10 in) until it appears at the handle opening. If catheter buckles while advancing, push on it closer to the entry of the cannula.
Step Six
While holding the catheter at incision site, slowly withdrawal the TUSP from the urethra. Then using cystoscopic guidance retrograde through urethra, withdraw the catheter tip retrograde into the bladder by pulling externally above the incision site.
Step Six
Step Seven
Once the catheter is within the bladder lumen, inflate the balloon to recommended volume. Then gently approximate the balloon against the anterior bladder wall. Secure the catheter externally with a suture.

Method of Use

Method of Use

Surgical Technique for ColMed TUSPTM
Step One
Use an appropriate sterile catheter. Lubricate and confirm it fits within the TUSP cannula. Lubricate and screw the trocar tip into the distal end of the cannula until flush — it is secure with minimum finger tightening.
Step Two
Place the patient in lithotomy position and prep with appropriate sterilizing solution. Perform cystoscopy to survey the anatomy of the urethra and bladder. If there is risk of urethral trauma, consider pre-placement of a guide wire (<0.038 in). Determine the optimal location for the trocar to exit the abdominal wall, and mark.
Step Three
Place the TUSP retrograde through the urethra, into the bladder. For a male, place penis on stretch. While gently angulating the handle, palpate for the tip of the device near the exit mark.
Step Four
Make an incision in the skin approximate 1 cm above the tip. While maintaining deflection on the abdominal wall with the TUSP, dissect the intervening tissue with electro-cautery until trocar emerges from the incision. Continue to push the trocar through incision about 5 cm. Remove the trocar tip and leave the cannula above the incision a few cm.
Step Five
Guide the lubricated catheter into the cannula about 25 cm (10 in) until it appears at the handle opening. If catheter buckles while advancing, push on it closer to the entry of the cannula.
Step Six
While holding the catheter at incision site, slowly withdrawal the TUSP from the urethra. Then using cystoscopic guidance retrograde through urethra, withdraw the catheter tip retrograde into the bladder by pulling externally above the incision site.
Step Six
Step Seven
Once the catheter is within the bladder lumen, inflate the balloon to recommended volume. Then gently approximate the balloon against the anterior bladder wall. Secure the catheter externally with a suture.

Features Overview

High Quality Material

Surgical Stainless Steel

Sterilizable, reusable

TUSPTM Features

a patent-pending “soft dimple-thread," which permits the smallest size cannula (23.8 Fr) to be used with the largest sized catheter (21.5 Fr)

Pricing

$1,799 per unit

$50 for shipping

SKU # 2201


Retrograde incisional placement of SPT has higher RVU’s than punch type placement. Uramix does not endorse any particular code for billing purposes. These codes are only provided for information purposes.

1,2,3 cms.gov

place an order

Fill out the information required and we will be in touch to continue the order process.

Monitor for Urologic Resection Fluid

Monitor for Urologic Resection Fluid2

MONITOR FOR UROLOGIC RESECTION FLUID

The Uramix Monitor of Urologic Resection Fluid – MURF (originally envisioned by Steven Ochs, MD) – is a portable electronic fluid monitor, which monitors fluid use during urologic endoscopic procedures, and provides sound alerts to allow for the timely replacement of fluid bags. This avoid unnecessary interruptions during the procedure or increased vision obscuring bleeding.

HAVE QUESTIONS?

Dr. Mooreville is available to answer by email or a telephone conversation can be scheduled.

REACH OUT TODAY

sales@uramix.com
+1 610.394.9850

Key Benefits

Easy to use and improves fluid management during endoscopic procedures.

Method of Use

The MURF is made to be user-friendly.

  • Hang the device first on the pole used to hang the fluid bags without any bags on it.
  • Pres “ON/OFF” key. The screen will display (8888) and the buzzer will utter the sound of being turned on.
  • Wait for 2-3 seconds until the (0.00 or 0.000) is displayed on the screen. The device is ready for monitoring.
  • Press the “TARE” key (zero) and the screen will display “0.000”. The device is ready for monitoring.
  • Hang one or two fluid bags on the device hook. The screen will display the weight/volume of the bags.
  • The device monitors fluid use and will give several sound warnings to warn operator when it is time to switch or replace fluid bags.
  • The device will give distinct warning sounds at 250 ml and at 100 ml of actual fluid to give the operator time to get ready to either switch bags or replace bags. The actual reading on the monitor might be different as the device also takes into consideration the weight of the bag or bags (up to two).
  • Press “ON/OFF” key to turn off.
  • The electronic monitor will not auto turn off; user should turn it off manually

Features Overview

Critical for Surgery

Prevents running out of fluid during critical parts of procedures

Easy to Use

Connects between hanging pole and bags

Sound Alerts

Provides sound alerts to notify surgical staff to change bags before they are empty

Aids Visibility

Helps prevent “red outs” (loss of visibility)

Prevent Clots

Helps prevent clot formation during “red outs”

Monitor for Urologic Resection Fluid2
Stay on Schedule

Avoids delays in procedure time

Safety is Paramount

Adds to patient safety

Easy To Power

Electronic Fluid Monitor uses 2 AAA batteries

Compact

Portable, pocket-sized, and easily stored

Reusable

No more single-use

Reliable

Consistent performance

Pricing

$195 for one

$295 for two

SKU # 5501

place an order

Fill out the information required and we will be in touch to continue the order process.